Showing posts with label chocolate. Show all posts

November 8, 2010

Christmas Cupcakes

Well, what can I say.  I really dropped the ball on posting Halloween themed treats. But I am not one to dwell on the negative.  Let's move on to the next big season.
Christmas!
I baked Devils Food Cupcakes.  This recipe was found at about.com and is by Diane Rattray.

Ingredients:
•3/4 cup unsweetened cocoa
•1 1/3 cups granulated sugar
•1 1/4 cups milk, scalded
•2 cups cake flour, sifted or stirred before measuring
•1 1/4 teaspoons baking soda
•1 teaspoon salt
•2/3 cup shortening
•3 eggs
•1 1/4 teaspoons vanilla extract

Preparation:
Prepare two 1 dozen cupcake trays with cupcake liners. Sift the cocoa with 1/3 cup sugar; pour into the milk gradually; stir until well blended. Set aside to cool. Sift together flour, remaining 1 cup sugar, soda, and salt. Add shortening and half of the cooled cocoa and milk mixture. Beat at medium speed of an electric hand-held mixer. Add eggs, vanilla, and remaining cocoa and milk mixture. Continue beating for about 2 minutes, scraping bowl with a spatula occasionally. Pour into cupcake tray. Bake at 325° for 25 to 30 minutes.Cool and frost devil's food cupcakes as desired.
 
I used icing colors to dye my icing, and my designs were piped using a #2 tip, and smoothed over with a spatula knife.

October 14, 2010

Spyro The Dragon

Thank you to my friend Kelly who thought of my cakes as her daughter Madyson's birthday neared.  Kelly requested a cake with Spyro the dragon.  Yikes!   I had never done a dragon before, but as usually as was up to the challenge.  Hmmmmm..... but how was I going to get the image of Spyro on Mady's cake?  I'll get back to that in a bit.

So Kelly wanted a marble cake to serve over 20 people.  We decided on a 10" two layered, that would end up being almost 5" high.

So here are the ingredients I used for my Marble Cake recipe:
- 2 cups sifted cake flour
- 2 teaspoons baking powder
- 1/2 teaspoon salt
- 1/2 cup butter or margarine
- 2 teaspoons vanilla extract
- 1 cup sugar
- 3/4 cup milk
- 3 egg whites 1 1/2 0Z. (1 1/2 sq.) unsweetened chocolate, melted and cooled
- 2 tablespoons hot water
- 1 tablespoon sugar
- 1/2 teaspoon baking soda
(found on ifood.tv)

Sift flour, baking powder, and salt together.

Cream the butter with extract; gradually add sugar, creaming until fluffy.
Beating only until smooth after each addition, alternately add dry ingredients in fourths and milk in thirds to the creamed mixture.
Beat egg whites until stiff, not dry, peaks are formed.
Fold beaten egg whites gently into batter until thoroughly blended.
Turn one half of the batter into a prepared 8x8x2-inch baking pan.
Lightly, but quickly, stir a mixture of the remaining ingredients into batter in bowl.
Spoon chocolate batter into pan. Gently lift white batter through chocolate until marbled effect is produced.
Spread batter evenly to edges of pan.
Bake at 350°F 40 to 45 minutes, or until cake tests done.

And now let's bring on Spyro the Dragon!
I went online and found a black and white drawing of Spyro.  I taped it to the base of a 9" square pan, and then taped parchment paper on top. 
On top of the parchment paper, I traced Spyro with a mixture of black buttercream icing and piping gel.  I used a #2 tip.  This gave me a nice thin line, but I still applied the lines a little thick.
I then applied the colours needed to make Spyro come alive.  I filled in colours in layers using a round tip. Make sure to use medium consistency frosting.  Using a knife dipped in hot water (and re-dipping as needed) I gently smooth frosting from the back to push down into crevices.  
I Filled in around pictures with my green background colour.  I chose the same colour I was using for the cake. 
I filled in the rest of the top and smoothed the icing out. I measured mine to a slightly smaller size than the diameter of the cake to place it on top of my already decorated cake.  I covered this with wax paper and lightly smoothed it with my handshands.  I then placed it in the freezer for overnight.

I removed the wax paper from the back of FBCT and placed it on top of the cake that had been completely frosted.  I peeled the wax paper from the front of FBCT, added boarders and wording.
And here we are!
July 12, 2010

Chocolate Shopaholic

A birthday cake for Jena. She may be only 10 years old, but she still had some definite, yet simple requests. Make her a chocolate cake --- and surprise her.

If you knew Jena, you would know that her request would not be as easy as it sounded. So I sat down thought about it, and remembered what makes Jena... Jena. Shopping on the town is what this girl does best!

Visit my Facebook Fan Page to view the comments.

June 12, 2010

Chocolate Picnic Cake

It was a wonderful day for a picnic. To embrace the mood, I decorated this 8" with fondant flowers. The buttercream icing contains Belgian Chocolate.

May 18, 2010

Ya Mon! Chocolate Rum Cake

Back from my vacation in Jamaica. My first cake to celebrate my trip. Why a two layered Chocolate Cherry RUM Cake of course! Finished off with buttercream icing and fondant accents.

Want to try it at home? Here is an easy recipe for you to follow:

Cake
1 package cake mix, chocolate
1 package pudding mix, instant chocolate, (4 servings)
4 large eggs
1/2 cup dark rum
1/2 cup water cold
1/2 cup vegetable oil
1 small can cherry pie filling

Heat Oven to 350F. Grease and flour 2 8" cake pans.

Combine first ingredients in large bowl. Blend well then beat on medium for 2 minutes. Pour into prepared cake pans. Bake for 30 mintues, or until done. Set aside to cool completly before frosting.

Buttercream Icing
1 cup shortening
1 tsp dark rum
1 tsp vanilla extract
3 tblsp water
4 cups icing sugar
1 tblsp meringue powder
1/2 cup dark semi-sweet chocolate

Combine first 4 ingredients together in a large bowl. Blend together. Add in icing sugar and meringue powder. Melt semi-sweet chocolate, and combine and mix with icing.

Icing cake adding cherry filling between layers.

April 28, 2010

Oh Boy! Baby Shower Cake

A baby shower cake for a Mom-to-be. I guess you can guess what she is expecting. This is a white chocolate cake, decorated with buttercream icing and gum paste fondant. 8"x8", 2 layers for a group of 20. Oh Boy.... here is the recipe:

- 2 1/2 cups all-purpose flour
- 1 teaspoon baking soda
- 1/2 teaspoon baking powder
- 1/2 teaspoon salt
- 6 (1 ounce) squares white chocolate, chopped
- 1/2 cup hot water
- 1 cup butter, softened
- 1 1/2 cups white sugar
- 3 eggs
- 1 cup buttermilk

Thank you goes to allrecipes.com. Check them out for their super white chocolate frosting.

February 21, 2010

Chocolate Covered Butter Cream

Melt in your mouth couveture chocolate, filled with butter cream icing. YES! This is absolutely as delicious as it sounds.

These are approximately 1" x 1/2". I am packaging 12 within truffle boxes decorated with yellow ribbon. These are the perfect sweet treats to present to friends, co-workers, or family. 12 pieces for $6.50.
If you are in the Greater Toronto Area, feel free order by emailing me.

January 10, 2010

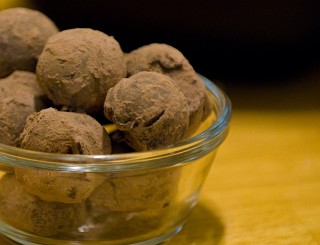
Easy Truffles!

I have finally found an easy truffle recipe for my first batch of truffles. It is a 2 ingredient truffle recipe using cream cheese and chocolate chips. Since I have already learned how to temper chocolate, I will continue to work with my couveture chocolate. On that note, I have now turned this two ingredient recipe into a 3-4 ingredient combination. This recipe should made 12 truffles.

I used Merckens melts in dark cocoa, and red for the outer coating, and chocolate couveture for the inside. I used colour to give these delicious treats a vibrant visual contrast. I spooned 3 oz of cream cheese into a bowl and stirred it until it was a smooth consistency.

I melted 3 oz of dark couveture chocolate, and then poured it into the cream cheese. I stirred the two together, and placed th mixture (covered) in the refrigerator for 1/2 an hour (15 minutes btw is fine) to cool and stiffen.

I removed my cream cheese / chocolate mixture from the refrigerator. I decided to use the Merckens Red for part of this batch. I formed my truffles into large marble size balls. I lined baking sheet with wax parchment paper.

I melted 2 oz of red candy melts using a microwave oven. I spooned out my chocolate mixture with a melon baller. I inserted a toothpick into the ball and then dipped it into the melts. I removed the ball from the toothpick and placed it on the wax paper. I made 6 red truffles. I melted about 4 of the Merckens cocoa melts and drizzled it onto my red truffles.

I used the same process, but now dipping the balled mixture into the Merckens Cocoa. As I finished each of those truffles, I sprinkled shredded coconut on them.

And VOILA!

January 8, 2010

Sweet Sixteen Request

I handed out 8 Chocolate samples today and I got back one request! A co-worker's daughter is turning 16 at the end of March, and she would like to place an order. I feel super excited, and blessed to recieve this "Sweet" Sweet Sixteen request.

I have some fab ideas to share with her. An avante garde chocolate theme, that will truly embrace the idea behind the Sweet Tooth Fashionista -- and have her daughter's friends, ending the evening with the coolest sweetest treats!

January 6, 2010

Ready - Send - Sample!

Yey! I have finally finished off the samples for my December 23, FaceBook Event. I created chocolate samples for the first set of people to join my FaceBook Group.

I made a white chocolate couveture bar, and painted hearts on it. I also added Merckens dark chocolate hearts, and painted those with red chocolate. My packaging looked a tad plain, so I added ribbon. I am liking the look now. I will have these in the mail, between tomorrow, and Friday.

January 4, 2010

Registered!

Ok.... So I neglected to mention that a week and a half ago, I registered my name "Sweet Tooth Fashionista". I just figured that it was a really cool and catchy name.

I guess I tend to venture on the positive side. I thought that if my blog caught on, then maybe another Sweet Tooth Fashionista would pop up.

This could also be a form of postive reinforcement for me. You know... If I am Legally what I envision myself to be --- Then I can be who I want to be.

So, I am just about ready to send out my chocolate samples to my FaceBook Group winners. I will drop them in the mail on Thursday this week. I can definitely say that I have the basic concept of preparing chocolates from molds. I was going to step up to bonbons, but when I read a recipe, I become a bit overwhlemed. I have decided to create chocolate truffles. I have finally obtained a fairly easy recipe, that has a shelf life of a month. A long shelf life is important to me right now, in case someone wanted me to ship an order to them.

December 26, 2009

Dipped Chocolate Fruit Party Favours

The morning before, I purchased strawberries, and berries. After washing them, I placed them in a plastic container, and submerged the berries in unflavoured vodka. Covering tightly, I placed the container in the refrigerator.

The next day, an hour before my guests arrived, I removed the strawberries and berries from the vodka filled container. With a paper towel, I patted the fruit dry. You don't want liquids to mix with your melted chocolate, or you will risk it seizing up.

In a glass bowl, I melted a container of dark chocolate wafers. After stirring the melted wafers, I began to dip the half of the strawberries in the chocolate. Working quickly, I placed them on a sheet of wax parchment paper. I did this with half of the berries, however because they were so tiny, I had to insert toothpicks in them first. I repeated the same process with the balance of the berries, using white melted chocolate wafers.

Using a decorators brush, I painted patterns onto the dipped fruit. For a few of them, I added red powdered food dye to some melted white chocolate, and painted some more of my fruit confections. I inserted toothpicks in all of the strawberries.

I placed a sheet of wax paper on my decorative plate and placed the dipped fruit on it. I placed the plate in the refrigerator for half an hour, pulled it out and voila. A devilish - sweet treat!

December 19, 2009

Grasshopper Becomes The Teacher

I had brought a few of my home made chocolates to work for my good friend Sukhi. She brought them home to share with her family. Later that evening, I received a FaceBook message from her.

Her family LOVED the chocolates, and especially enjoyed the white chocolate Santa. She added that my confections were "the bomb".

FYI-- that is a VERY good thing.

She had asked me if I would visit her home, and give both her and her daughter a lesson in making chocolate. I said yes, but honestly, I didn't think she was serious. She came back a week later and said that another one of our co-workers -- Angie was coming to visit, and if she would join us.

So, this Wednesday, I will be driving to Brampton to conduct a chocolate making workshop.

Isn't life funny? Not ha ha funny.

Exactly two weeks ago, I was getting excited about learning how to make chocolate. Look at me now. I will be giving an instructional course on how to make chocolate.

Tomorrow, I take on the world!

Ok-- getting overly excited. Calm down Dee... Calm down.

What will THEY need:
-glass measuring 2 cup (microwave safe)
-two small glass or ceramic bowls / cups
-a few medium sized spoons for mixing
-a small bag of almonds and
-an apron
-wax parchment paper
-a sealed container to hoard their chocolate sweets

The supplies / ingredients that I will BRING for them will be
-three colours of powdered food dye
-600 g of Merckens White
-600 g of Merckens Cocoa Lite
-decorator paint brush
-cotton gloves
-small cake box
-sleigh mould, Christmas mould, and a heart mould (for Valentines Day)

I will be picking up the majority of these suppiles at Scoop 'N Weigh Foods Limited.

December 12, 2009

Chocolate Christmas Candy

I have a potluck at work next week and I have decided to make chocolate treats. There are 32 people in my department, so I decided to economize using Merckens Chocolate melting wafers.
I purchased molds in various Christmas themes. Santa, JOY, Drummer Boy and a Snowman. I bought Merckens Milk Cocoa Lite and Merckens WHITE. I also bought powdered food dye to add colour to my treats.

Merckens candy wafers are very easy to use and do not require tempering. Merckens chocolate wafers are by far the best tasting wafers. They do not have a waxy taste to them. I half way filled a small glass containers with the Merckens white. I added a bit of powdered food dye to each container. One red, one yellow, and one green. I heated up the red container in my microwave oven for 1 minute. Using a spoon I mixed the red wafer, until it became creamy. Using a fine paint brush, I painted various parts of my mold. For example, red on Santa's hat, or red on the snowman's mittens. Once finished with that colour, I melted the yellow wafers and painted, and them moved on to the green. Once my chocolate molds were painted, I filled larger glass containers with the chocolate wafers. One with the Merckens White, and the other with the milk cocoa.
I melted the white first for a minute and a half. And stirred vigorously.
Using a spoon, I filled some of my molds 3/4 full. I followed the same process with the Merckens Cocoa. I filled the balance of my molds the same way. (each mold sheet, has about 12 molds). I tapped the sheet a bit, so the melted chocolate would spread, filling the smallest parts of the molds. I then placed my molds in the refrigerator for about two hours.

You know your chocolate is ready to be popped from their molds when the color of the chocolate has gone from shiney to matte. I tapped my chocolate on to wax paper. and voila!